Thursday, October 24, 2013

Remixing the World


In the video Is Photoshop Remixing the World, they discuss opportunities made available by limitless capabilities. Artists can do far more than they could ever do, shaping the way society perceives reality. We can shape the perception of reality to fit both perfection, and political views. The video gave an example of replacing guns in movies with a “thumbs up,” as an anti-violence statement, altering the meaning of the famous scenes while being charming and funny. Photoshop is remixing images in a way never possible before, conveying a message in a universal way, through the visual image. My concept is to take well know wonders of the world and remix them through a global turntable.    

sources :


photo by Malia Bush


                                                                                                painting by Malia Bush
                                                                                                   to see more of my art click here

Thursday, October 17, 2013

foggy imitation


The world's first photograph was taken in France by Joseph Nicephore Niepce in 1862. It was an eight hour exposure involving light sensitive varnish, petroleum, and lavender.


I attempted to recreate the look by using a photograph that I took of San Francisco:


After turning the image black and white, I added noise and speckle to the photo, as well as a blur. I used an exposure layer and adjusted the gamma correction. I used the brightness and contrast layer to lower the contrast and brighten the photo a bit. This was largely a trial and error process for me. I enjoyed the contrast between the old city landscape and the ever busy San Fransisco. Oh, how the landscape had changed. 

to read more about the world's first photograph:  click here

Monday, October 7, 2013

the wright mask


Beginning 

BY JAMES WRIGHT

The moon drops one or two feathers into the field.   
The dark wheat listens.
Be still.
Now.
There they are, the moons young, trying
Their wings.
Between trees, a slender woman lifts up the lovely shadow
Of her face, and now she steps into the air, now she is gone
Wholly, into the air.
I stand alone by an elder tree, I do not dare breathe
Or move.
I listen.
The wheat leans back toward its own darkness,
And I lean toward mine


Masks are great ways to expose an area without making permanent changes to the image. I found this much easier and more forgiving than a selection tool. You can non-destructively layer, isolating the opacity and color of a single item, by creating a layer mask and using your brush tool to expose the under image.


When you use the brush tool with black, it exposes the under layer. 
And when you use white, it puts back the layer on top.  


Creating a mask is easy. After you select the images you want to use:

1. Make a rough selection of the image you want on top with the lasso tool.  
2. Copy (control C).
3. Paste (control V) on the background image.
4. Make a mask using the layers and mask icon (square with circle inside).
5. Use your tool brush in BLACK to paint away unwanted top part of layer.

You can play around with the opacity of specific areas. And you can isolate filters, like black and white, too.

- to reset colors to black and white, just press D


Sources of the composed images:


to see more of my art, visit:   maliab.net

Monday, September 30, 2013

look deep into my depth


Depth of Corn Field

As a photographer, I am very attracted to pictures with a dramatic depth of field. It makes the subject pop, making the photograph more artistic. When I shoot, I try to create this effect by using a large aperture. It blurs my pictures quite nicely.

If you did not capture the image's depth of field the way you envisioned it while shooting, you can still make that happen using your Photoshop. It's super easy.

I found an image that I thought would look cool with a little more depth to it. I chose a piece from my monster series. This photo is of a fire monster. A corn field near my house caught fire and the scorched stalks and charred land made a nice backdrop for this sultry element.  

After I applied a color balance layer to lessen the sunset's amber glow, I made a duplicate layer of the image by right clicking on the background image under the layers column, and then choosing DUPLICATE LAYER.

Now I am working on the copy.

Next I go to FILTER to BLUR to GAUSSIAN

I changed the radius to look a little more blurred, and hit OK. The whole copy looks blurry now.

Then I created a mask on the blurred copy (the mask icon is the circle inside rectangle, like a little camera).

I selected the GRADIENT TOOL. It's a square shaped icon in your tools.

Then I clicked on the side I wanted most blurred, in the corm example it's the top of the picture down to the burnt ground.  And then I drew a line to the point I wanted to be in focus.

That's it, beautiful depth of corn field has been created!


To see more of my art:   maliab.net   


Monday, September 23, 2013

Compliments to the Duotone

                                                                                                                
My, That's Nice

Just because we contrast-
doesn't mean we can't be complimentary!

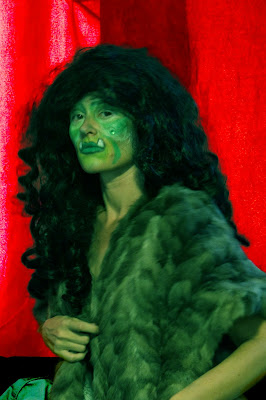
Complimentary colors are colors that are opposite each other on the color wheel. Green and red, both beautiful colors, happen to compliment each other. 

In this self-portrait, I am channeling my inner reptile. My cold green skin pops against the red curtain.  

1.  I started the process by cropping down my image.

2.  I used my selection brush to select my image. My face was already painted green.   

3.  I created a layer of color balance (the little scale icon). And then I shifted over the color to both green and blue to create this beautiful reptilian skin. The curtain was already red. 

4.  I turned up the saturation just a tadpole.  


This is a picture taken by Rich Bruce (my hubby) with the House of Dig (our art photography). There was a nice light shining in the room. My house was already destroyed by a pillow fight, so I jumped in the feathers and threw on some wings and makeshift veil. We like the photo, but the light was casting an orange glow on my face and also the blue walls looked more white.  

 I used curves to bring out the highlights and bring out the shine from the sunlight on my face. 

I made a color balance layer, moving towards blue and towards cyan. This brought out the blue of the background wall behind me, and took away some of the orange cast off my face. 

Then I created a layer of brightness and brightened it slightly to make the picture seem angelic and sweet.

Now the image looks soft with the pretty pinks and blues of reality.


bearly noticeable


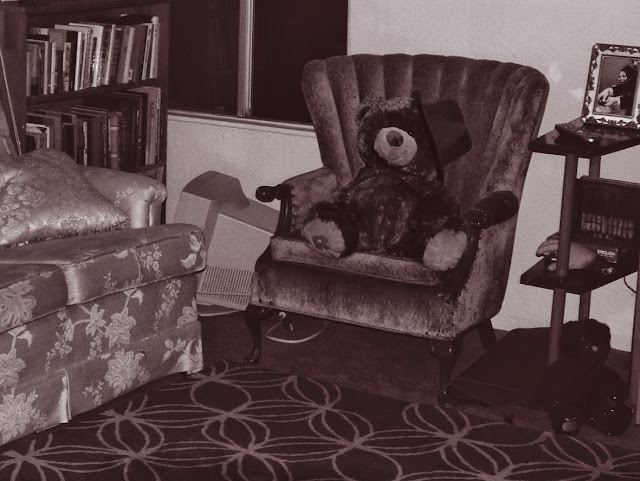
Duotone is my new favorite thing in Photoshop. It is an image made up of just two colors. The images are rich with vintage tones.You can really enhance or change the feeling of a photograph. There is a nice tonal range to choose from.  People look especially flattered.    

 A typical day at our old apartment in Alameda.
This photograph just needed a special sort of something bear before the Duotone was applied.


To add the bear:

1.   I used the rectangular marquee to capture the bear. 
2.   I hit control "C" to copy the image. 
3.   I went to the living room photo and click "V" for paste.
4.   Hit the button that says "Refine edges."
5.   Cleaned up the edges a bit by changing the radius and feathering a bit. 
6.   Hit control "T" to transform, or change the size of the teddy bear and move him to the chair.


    There's your Bear in Chair


but then ... the Duotone. 

After I fiddled with the brightness and contrast I:

       -   Went to Image, Mode, Grayscale.

       -   Went to Image, Mode, Duotone.

       -   Went to Custom and picked my poison.


Why black and white when you can Duotone?

*** But remember: You have to change it back to RBG before you can save it as a JPEG


To read more about Duotones in Photoshop by Adobe   click here